OpenRouter Configuration
Here, we will use OpenRouter as an example to explain how to configure the LLM models for JupyDeep. OpenRouter offers a wide selection of LLMs, including many free options, making it highly convenient for testing various models.
I have attached a video reference demonstrating the setup details.
This document highlights the critical steps you need to pay close attention to.
First, please visit the official OpenRouter website to register an account.
After registering and accessing your personal account settings, navigate to the “Profile” menu and select “API Keys.” Follow the guidelines to fill in the required information.
Once you have generated the API key, you will need to configure it as an environment variable in your operating system.
Note
For macOS and Windows, please consult the relevant online documentation to set up environment variables on those platforms.
Using Ubuntu as an example, run the following commands to append the variable to your profile:
$ echo "export OPENROUTER_API_KEY=<your_api_key>" >> ~/.bashrc
# Verify that the variable was added correctly
$ tail ~/.bashrc
$ source ~/.bashrc
We can now create a dedicated project directory to verify the installation of JupyterLab and JupyDeep.
Note
Before proceeding, ensure that the uv package manager is installed on your computer.
Run the following commands to initialize the environment and install the required dependencies:
$ mkdir ~/jupydeep_demo
$ cd ~/jupydeep_demo
$ uv init
$ uv add jupyterlab jupydeep
$ uv run jupyter lab --ip=0.0.0.0 --no-browser
Once JupyterLab starts successfully, copy the URL provided in the terminal and paste it into your browser’s address bar. You should see the JupyterLab workspace open, displaying the JupyDeep icons.
You will also notice that no agents are available yet, as this is your first time launching JupyDeep. To get started, navigate to the “Settings Editor” to configure our LLM settings.
As shown in the figure below, fill in the llm_api_key field using our previously configured environment variable: ${OPENROUTER_API_KEY}.
The llm_api_base (the base URL) can also be obtained from the OpenRouter website. Please visit the OpenRouter Documentation page,
where you can find this information under the “Agent SDK” section. Fill in the llm_api_base field with the value of https://openrouter.ai/api/v1 .
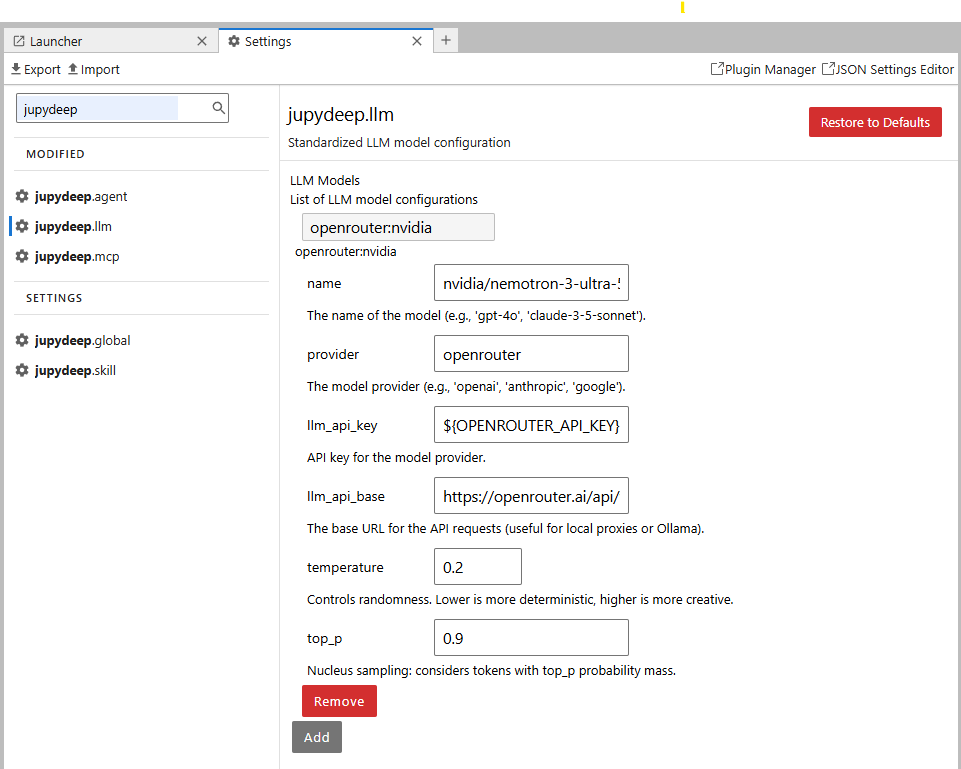
The provider field should be set to openrouter. For the model name, you can browse the OpenRouter Models page
to find one that suits your needs. In this example, we will use the free model from NVIDIA: NVIDIA: Nemotron 3 Ultra (free). Simply copy the model
string nvidia/nemotron-3-ultra-550b-a55b:free from the webpage and paste it into the name field.
Once saved, a green notification should pop up in the bottom-right corner, indicating that the LLM has been successfully configured. The “Agent Panel” will automatically update to reflect the changes, revealing two built-in agents. You can now select our newly configured LLM for them. JupyDeep is now fully operational and ready for conversation—feel free to explore and enjoy its features!
Built on the Pydantic AI architecture, JupyDeep inherently supports numerous LLM providers. OpenRouter is used here merely as an example; for other platforms,
please consult their specific documentations, paying close attention to the API_KEY and API_URL setups.
We highly recommend reviewing the Pydantic AI Documentation for an in-depth overview of model integration.